我的客戶透過老師 LMS 為針灸師提供線上課程。美國法律要求 「針刺註冊號」,以便學生獲得最終的線上證書。所以這個任務比平時有點複雜一些,因為它有兩個主要問題:
1) 這個新的結帳欄位不屬於結算或發貨 (訂單資訊),而是必要時需要多次儲存和檢索的唯一使用者欄位
2) 如果某個產品類別在購物車中 (「線上課程」,而不是 「書」),則該欄位確實需要在結帳時顯示。
所以,這是您如何做 – 希望它可以幫助您瞭解任何事情都可以透過 PHP!
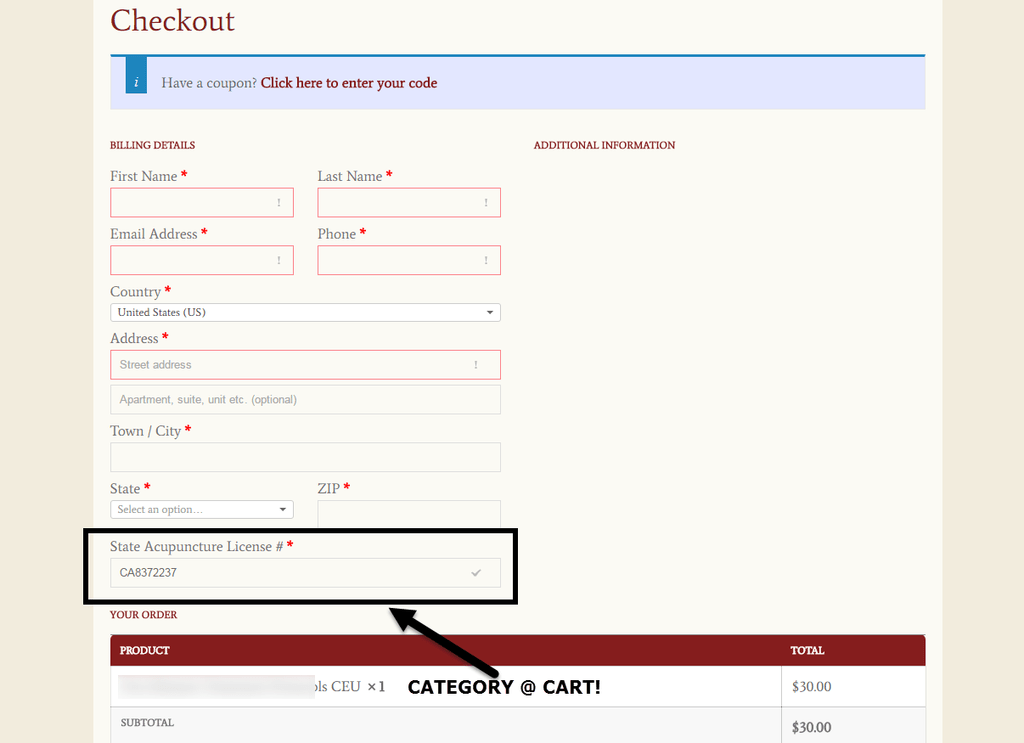
PHP Snippet(第 1 部分,共 5 部分):在 Checkout 中新增使用者欄位 (僅當類別在購物車中時才顯示)
/** * @snippet Add User Field Conditionally @ WooCommerce Checkout Page * @sourcecode https://businessbloomer.com/?p=20560 * @author Rodolfo Melogli * @testedwith WooCommerce 2.5.5 */ add_action( 'woocommerce_after_checkout_billing_form', 'bbloomer_add_acu_no_if_online_course' ); function bbloomer_add_acu_no_if_online_course( $checkout ) { // see if user has a previously saved Acupuncture # $current_user = wp_get_current_user(); $saved_acu_no = $current_user->student_acu_no; // echo field only if bloomer_check_product_category() is true if( bloomer_check_product_category() ){ echo '<div id="student_acu_no">'; woocommerce_form_field( 'student_acu_no', array( 'type' => 'text', 'class' => array('student_acu_no form-row-wide'), 'label' => __('State Acupuncture License #'), 'placeholder' => __('CA12345678'), 'required' => true, 'default' => $saved_acu_no, ), $checkout->get_value( 'student_acu_no' )); echo '</div>'; } } // Function that returns true/false if category is in the cart // Is called by function bbloomer_add_acu_no_if_online_course() function bloomer_check_product_category(){ foreach ( WC()->cart->get_cart() as $cart_item_key => $cart_item ) { $product_id = apply_filters( 'woocommerce_cart_item_product_id', $cart_item['product_id'], $cart_item, $cart_item_key ); if( bbloomer_is_category_18_in_cart( $product_id ) ){ return true; } } return false; } // Function that specifies category ID for bloomer_check_product_category() // Is called by function bloomer_check_product_category() function bbloomer_is_category_18_in_cart( $product_id ){ // ID 18 = online courses return has_term( 18, 'product_cat', get_post( $product_id ) ); } PHP Snippet(第 2 部分,共 5 部分):驗證新的 Checkout 域
現在,一旦結帳處理完畢,我們至少要確保欄位不為空。記住,我們用一個選項 [‘required’=> true] 回撥一個欄位,這意味著我們需要填寫這個欄位!
以下是我們如何保證在欄位為空時顯示錯誤訊息:
// Validate Checkout Field add_action('woocommerce_checkout_process', 'bbloomer_validate_new_checkout_field'); function bbloomer_validate_new_checkout_field() { if ( ! $_POST['student_acu_no'] ) wc_add_notice( __( 'Please enter your Acupuncture Licence number' ), 'error' ); } PHP Snippet(第 3 部分,共 5 部分):將新的 Checkout 域儲存到使用者元
如果驗證成功,我們當然希望將針刺許可證號碼儲存到使用者資料庫 (稱為 「使用者元」) 中。這很簡單:
// Save Field Into User Meta add_action('woocommerce_checkout_update_user_meta', 'bbloomer_checkout_field_update_user_meta'); function bbloomer_checkout_field_update_user_meta( $user_id ) { if ($user_id && $_POST['student_acu_no']) update_user_meta( $user_id, 'student_acu_no', esc_attr($_POST['student_acu_no']) ); } PHP Snippet(第 4 部分,共 5 部分):在使用者個人資料頁面中顯示新欄位
此外,很明顯,我們希望管理員在必要時更改此欄位。首先,我們需要在使用者個人資料頁面中顯示。最後,我們需要確保在更新時更新使用者 meta:
// Display User Field @ User Profile add_action( 'show_user_profile', 'bbloomer_show_user_extra_field' ); add_action( 'edit_user_profile', 'bbloomer_show_user_extra_field' ); function bbloomer_show_user_extra_field( $user ){ ?> <h3>Additional Fields</h3> <table class="form-table"> <tr> <th><label for="student_acu_no">Acu #</label></th> <td><input type="text" name="student_acu_no" value="<?php echo esc_attr(get_the_author_meta( 'student_acu_no', $user->ID )); ?>" class="regular-text" /></td> </tr> </table><?php } // Save User Field When Changed From the Profile Page add_action( 'personal_options_update', 'bbloomer_save_extra_fields' ); add_action( 'edit_user_profile_update', 'bbloomer_save_extra_fields' ); function bbloomer_save_extra_fields( $user_id ){ update_user_meta( $user_id,'student_acu_no', sanitize_text_field( $_POST['student_acu_no'] ) ); } PHP Snippet(第 5 部分,共 5 部分):在 WooCommerce 訂單明細中儲存並顯示新欄位
此外,我們要在訂單詳細資訊上顯示針灸號碼。發出證書前,管理員需要仔細檢查號碼是否正確。
// Update order meta with field value add_action('woocommerce_checkout_update_order_meta', 'bbloomer_custom_checkout_field_update_user_meta'); function bbloomer_custom_checkout_field_update_user_meta( $order_id ) { if ($_POST['student_acu_no']) update_post_meta( $order_id, '_student_acu_no', esc_attr($_POST['student_acu_no']) ); } // Display User Field @ Order Meta add_action( 'woocommerce_admin_order_data_after_billing_address', 'bbloomer_checkout_field_display_admin_order_meta', 10, 1 ); function bbloomer_checkout_field_display_admin_order_meta($order){ echo '<p><strong>'.__('Acu #').':</strong> ' . get_post_meta( $order->id, '_student_acu_no', true ) . '</p>'; } 如何新增此程式碼?
1 、您可以將 PHP 程式碼片段放置在主題或子主題的 functions.php 檔案的底部 (如果是 CSS 程式碼,請新增到子主題的 style.css 檔案底部) 修改之前建議先備份原始檔案,若出現錯誤請先刪除此程式碼。
2 、 WordPress 4.9 後改進了主題編輯器,對於 CSS 程式碼也可開啟網站前臺編輯器的 【自定義】,複製程式碼新增到自定義 css 中。
此程式碼是否可用?
如需幫助或是您有更好的方案想分享?請到薇曉朵 WooCommerce 中文論壇留言告知,我們希望可以幫到更多國內的 WooCommerce 使用者也希望您的參與。